 AzerothCore
How to create a PR
This guide explains how to open PRs to submit any kind of fixes (C++, SQL, etc...).
Every step below is shown twice: once for GitHub Desktop (a graphical app,
no terminal involved) and once for the command line (git). Both produce exactly the same result,
so just pick the one you feel comfortable with and ignore the other. You can also mix them:
GitHub Desktop is a normal git client, so a repository cloned with it works fine from the terminal and vice versa.
If you happen to submit only DB fixes, you might give it a try to our simplified way of opening a PR containing SQL code: that one is done entirely from the GitHub website and requires no tool at all.
Pick your path
Creating the fork and opening the PR itself are done on the GitHub website and are the same for everybody. These are the steps where the two paths differ, so you can jump straight to the instructions for your tool:
| Step | GitHub Desktop | Command line |
|---|---|---|
| Clone your fork (only the first time) | clone with the app | clone with git |
| Update your local clone | update with the app | update with git |
| Create a new branch | branch with the app | branch with git |
| Choose the files to submit | select with the app | select with git |
| Create the SQL file (DB fixes only) | create with the app | create with git |
| Commit and push | commit with the app | commit with git |
Do only ONCE: create and clone your AzerothCore fork
1. Create a fork of AzerothCore
This step is done on the GitHub website, no matter which tool you use afterwards.
You need to be signed on github.com. If you don't have an account yet, create one.
Open the AzerothCore repository and create a fork of it by clicking in the top-right "Fork" button:
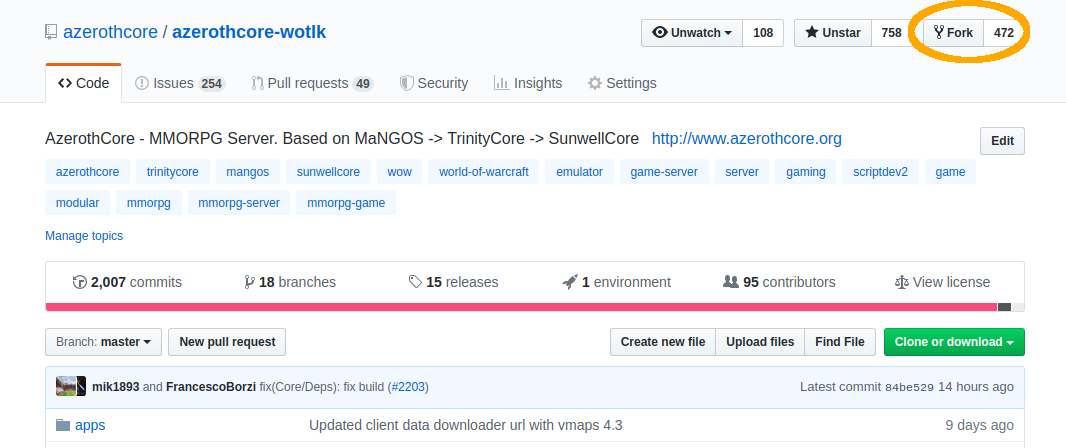
A fork is your own copy of AzerothCore, living under your GitHub account. You can do whatever you want in it: the changes only reach AzerothCore when you open a PR and it gets merged.
2. Clone your fork to your local machine
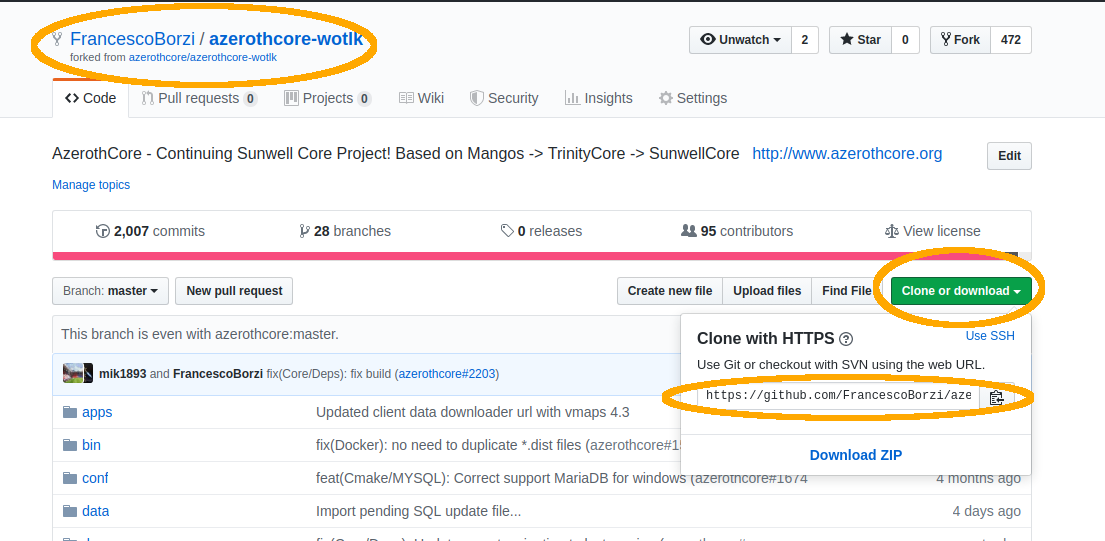
Once your fork is ready, you will see a screen showing YourUsername/azerothcore-wotlk.
Cloning means downloading that fork to your computer, so you can edit the files with your usual editor.
Clone with GitHub Desktop
- Download and install GitHub Desktop, then sign in with your GitHub account (File → Options → Accounts).
- Go to File → Clone repository... and open the GitHub.com tab: your fork
YourUsername/azerothcore-wotlkis listed there. - Choose the Local path where you want the sources to be downloaded and click Clone.
Signing in via GitHub Desktop also takes care of the authentication, so you will not be asked for credentials when you push later on.
Clone with the command line
Click on the "Clone or download" button (on the right) and copy the https address of your fork:
Now open the terminal (if you are on Windows, use the git bash terminal)
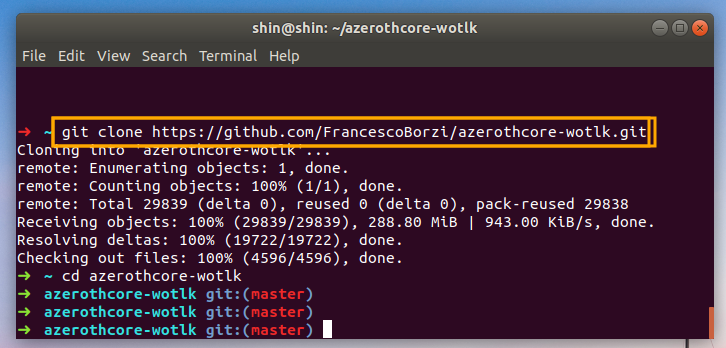
and type git clone followed by the git address of your fork that you just copied:

git clone https://github.com/YourUsername/azerothcore-wotlk.git
Wait until the download ends and then access the azerothcore-wotlk directory:
cd azerothcore-wotlk
Creating a new PR
1. Update your fork on GitHub
Open your browser and navigate to your fork on GitHub (change YourUsername with your actual GitHub username):
https://github.com/YourUsername/azerothcore-wotlk
If your master branch is not up to date with latest AzerothCore, you'll see something like:
This branch is XX commits behind azerothcore:master
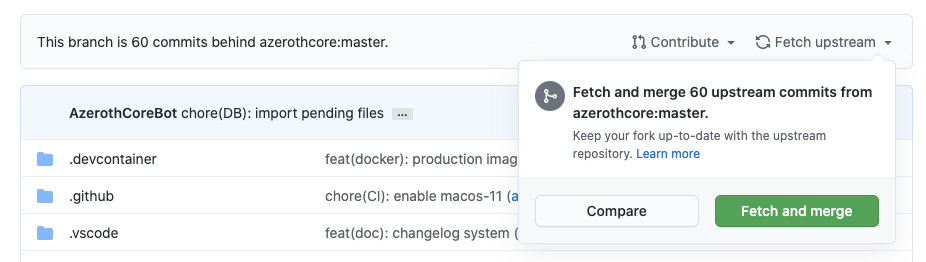
to update it, click on Sync fork (called Fetch upstream in older versions of the GitHub interface) and then confirm with Update branch / Fetch and merge.
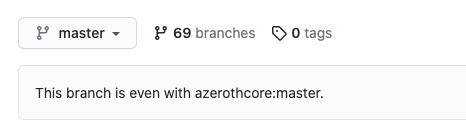
As a result, your fork's master branch should say:
This branch is up to date with azerothcore:master
2. Update your local clone
In the previous step you just updated your remote fork, but you have to sync your local clone as well.
Update your clone with GitHub Desktop
Select the master branch in the Current branch dropdown, then click Fetch origin and,
once it turns into Pull origin, click it again.
Update your clone with the command line
Open your terminal inside the azerothcore-wotlk directory and run:
git checkout master
git pull
3. Create a new branch
A branch is an isolated line of work: one branch = one PR. When creating a new branch, git will create a
copy of your current branch, so always make sure you are on an up to date master before creating it.
Give the new branch a name that is different than any existing branch. You can give any name you want
(replace "xxxx" with whatever you are fixing), for example fix-issue-xxxx.
Create the branch with GitHub Desktop
Open the Current branch dropdown, make sure master is the selected branch, then click New branch,
type the name and confirm with Create branch.
The Current branch button now shows your new branch: everything you commit from here on goes into it.
Create the branch with the command line
git checkout master
git checkout -b fix-issue-xxxx

4. Add your C++ changes (if any)
Make sure all changes abides the C++ Code Standards!
If you don't have any C++ changes, you can skip this. Otherwise, open your editor and do them now! I'll wait...
In this guide we will assume that you modified the file instance_deadmines.cpp
Selecting files with GitHub Desktop
Nothing to do: as soon as you save the file, it shows up in the Changes tab on the left, with the checkbox already ticked. Only the ticked files will be part of your commit, so untick anything you do not want to submit, and click on each file to review your own diff before committing.
Selecting files with the command line
Now add your file(s) to be committed:
git add src/server/scripts/EasternKingdoms/Deadmines/instance_deadmines.cpp
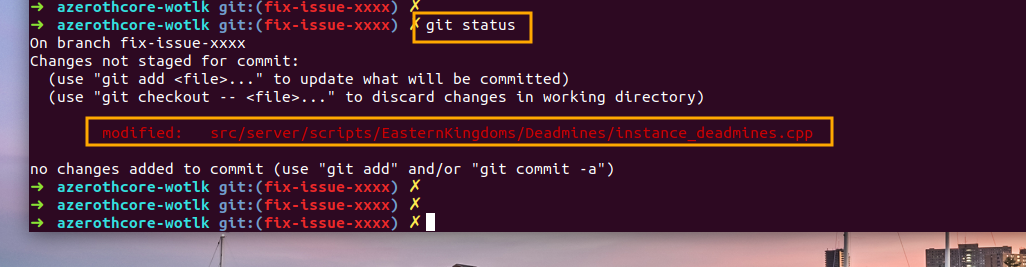
If you modified more files, just add them using git add path/to/file
You can use the git status command to check which files have been selected to be committed:

5. Add your SQL changes (if any)
If you don't have any SQL changes, you can skip this.
Otherwise your SQL code must go into a new file inside the data/sql/updates/pending_db_world folder,
named rev_XXXXXXXXXXXX.sql where XXXXXXXXXXXX is a number that nobody else has used yet
(a timestamp is the usual choice). Never edit the already existing rev_*.sql files.
Create the SQL file with GitHub Desktop
Create the file yourself with your editor (or your file manager) inside the
data/sql/updates/pending_db_world folder of your clone, using a name such as
rev_1700000000000.sql, and put your SQL code in it.
Once saved, the new file appears in the Changes tab like any other change.
Create the SQL file with the command line
A helper script generates the file with a unique name for you:
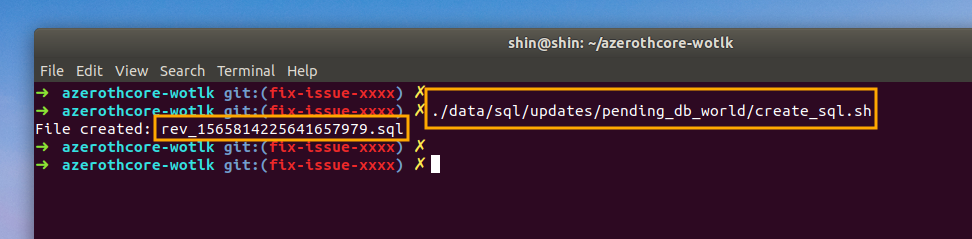
./data/sql/updates/pending_db_world/create_sql.sh
This will generate a new file located at data/sql/updates/pending_db_world
having a unique name that looks like rev_XXXXXXXXXXXX.sql
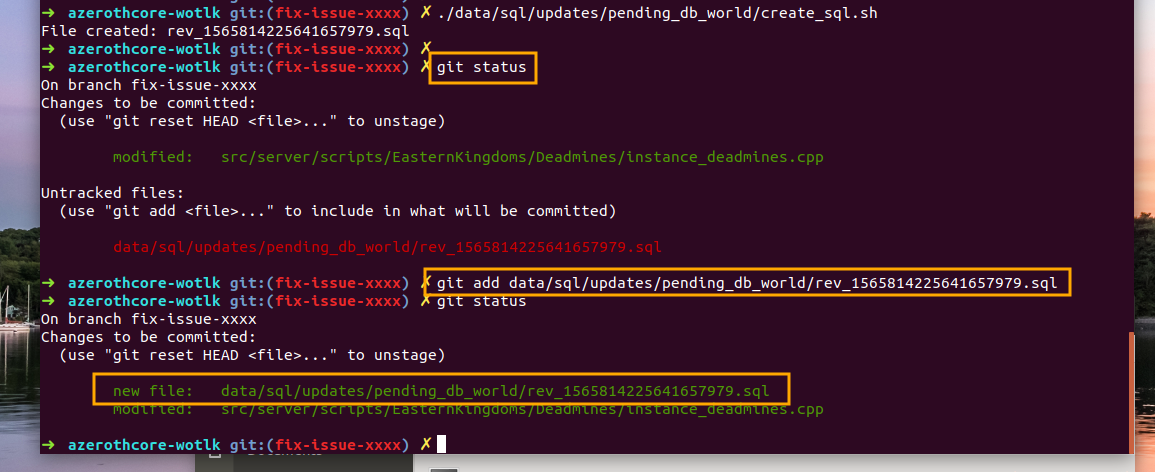
Write your SQL code in it, then add the file to be committed using the git add path/to/file command:
git add data/sql/updates/pending_db_world/rev_XXXXXXXXXXXX.sql
(of course replace rev_XXXXXXXXXXXX.sql with the actual name of the file)
6. Commit & Push your changes
A commit is a snapshot of your changes together with a message describing them; pushing uploads your commits to your fork on GitHub.
We use the Conventional Commits format for the commit message, for example:
fix(DB/Creature): Deadmines - Mr. Smite no longer resets
You can refer to a commit like this one as an example.
See the commit message guidelines for the accepted types, scopes and more examples.
Commit and push with GitHub Desktop
At the bottom left, fill the Summary field with the commit message and, optionally, use the Description field for more details. Then click Commit to fix-issue-xxxx.
type(Scope): description line yourself.Finally click Publish branch (it becomes Push origin for the following commits) at the top of the window.
Commit and push with the command line
Do only ONCE: git config
First of all make sure to use the AC commit template (this should only be necessary once):
git config --local commit.template ".git_commit_template.txt"
When you will write your commit message, it will use the default text editor Vim which is very hard to
manipulate. You can keep it or you can instead use the much simpler Nano editor. Here is how to proceed, type:
git config --global core.editor "nano"
Git commit
Then commit your changes by typing:
git commit
You are then prompted to specify an appropriate commit message. Please, follow the format guidelines shown
in the template (= every line starting by a # will be ignored in the commit message).
If using Nano, press [ctrl]+[x] and say yes to save and exit (other commands are written at the bottom in
Nano, and can be found easily on the net or by typing man nano in the terminal).
Verify you're satisfied by typing git show. Exit by pressing [q]. If not satisfied, you can recommit the
last local commit by typing git commit --amend.
Now it's time to push them remotely.
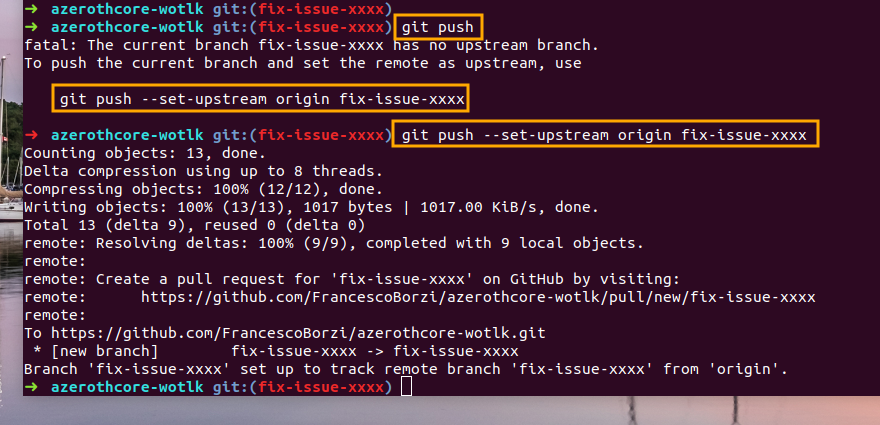
If you use the git push command for the first time in this branch,
git will ask to specify which remote branch you want to push to.
So you should give:
git push --set-upstream origin fix-issue-xxxx
(of course replace fix-issue-xxxx with the actual name of your branch)
7. Open the PR
This last step happens on the GitHub website and it is the same for everybody.
Go back to the main AzerothCore repository, you will notice that GitHub is smart enough to realize that you are about to open a PR and shows this nice light-yellow box:
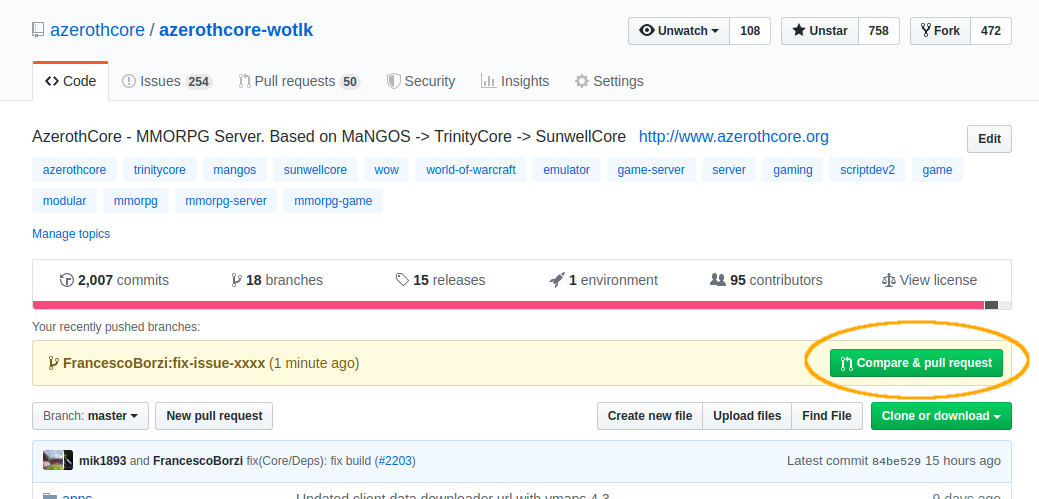
click on the "Compare & pull request" green button (located on the right).
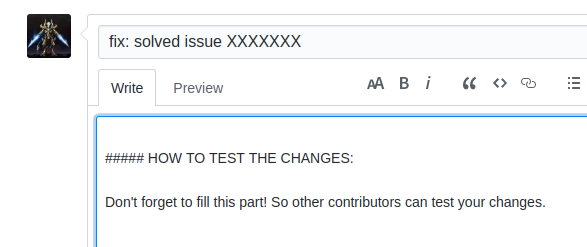
Now fill the PR template following the instructions that will appear in the screen, do not forget to add the testing instructions so people can be able to test your PR and it can be merged:
It's also a good practice to check the "File changes" tab to see that everything is in place as you expect:

That's it!
FAQ
There is something wrong or missing in the file changes, I want to push more changes
Just edit/add the files that you want, commit and push them again on the same branch. If you refresh your PR's page you will see the changes: there is no need to open a new PR.
- GitHub Desktop: the edited files reappear in the Changes tab, commit them and click Push origin.
- Command line:
git addthe files, thengit commitandgit push.
I've already created a PR, what should I do to create another one?
Just repeat the procedure starting from the step 1 of Creating a new PR: each PR needs its own branch.
Be careful when creating a new branch: you must start from an up to date master
(with the command line, type git checkout master first; with GitHub Desktop, select master
in the Current branch dropdown before clicking New branch).
How can I update my fork's master branch?
The easiest way is the Sync fork button on your fork's page on GitHub, as described in step 1, followed by a pull of your local clone (step 2).
From the command line you can also do it without the browser. If you never updated your fork before, type:
git remote add upstream https://github.com/azerothcore/azerothcore-wotlk.git
Then follow these steps:
git checkout mastergit fetch upstreamgit merge upstream/mastergit push origin master
Your fork is now updated.
How can I update my branch with latest master?
You have to update your fork's master branch first (see above).
- Command line:
git checkout your-branchand thengit merge master. - GitHub Desktop: select your branch in the Current branch dropdown, then Branch → Update from master, and finally Push origin.
How much time does it take for my PR to be reviewed, tested and merged?
This is an open source project and people work in their free time, so we cannot estimate it.
What we can recommend is: write clear instructions to test your PR, so it will be easy for anyone to test it.
If your test instructions are not clear or missing at all, only advanced users will be able to test your PR and it will take much more time.
What terminal was used in this tutorial?
https://github.com/robbyrussell/oh-my-zsh
But any linux/mac terminal is ok too. If you are on Windows, use git bash (or GitHub Desktop, if you prefer to avoid the terminal altogether).
Do I have to re-authenticate every time I use git push?
With GitHub Desktop this is already handled: you signed in once when you installed it.
With the command line you can clone your own fork using SSH instead of HTTPS and then follow
this guide
to set the SSH keys. This way you can use git push without typing your password over and over.
I messed up my branch / my fork, how do I start over?
Nothing is lost as long as your work is still on your machine or on your fork.
The simplest fix is to create a new branch from an up to date master and redo the changes there
(the old branch can be deleted afterwards). If your fork's master itself got messy, you can delete the
whole fork on GitHub and fork AzerothCore again, then clone it once more.