Windows Requirements
| Installation Guide | |
|---|---|
| This article is a part of the Installation Guide. You can read it alone or click on the previous link to easily move between the steps. | |
| << Start: Installation Guide | Step 2: Core Installation >> |
Boost ≥ 1.78
MySQL ≥ 5.7.0 (Recommended version: ≥ 8.0)
OpenSSL ≥ 3.0.x (Ver. 3.1 and above are not supported.)
CMake ≥ 3.16
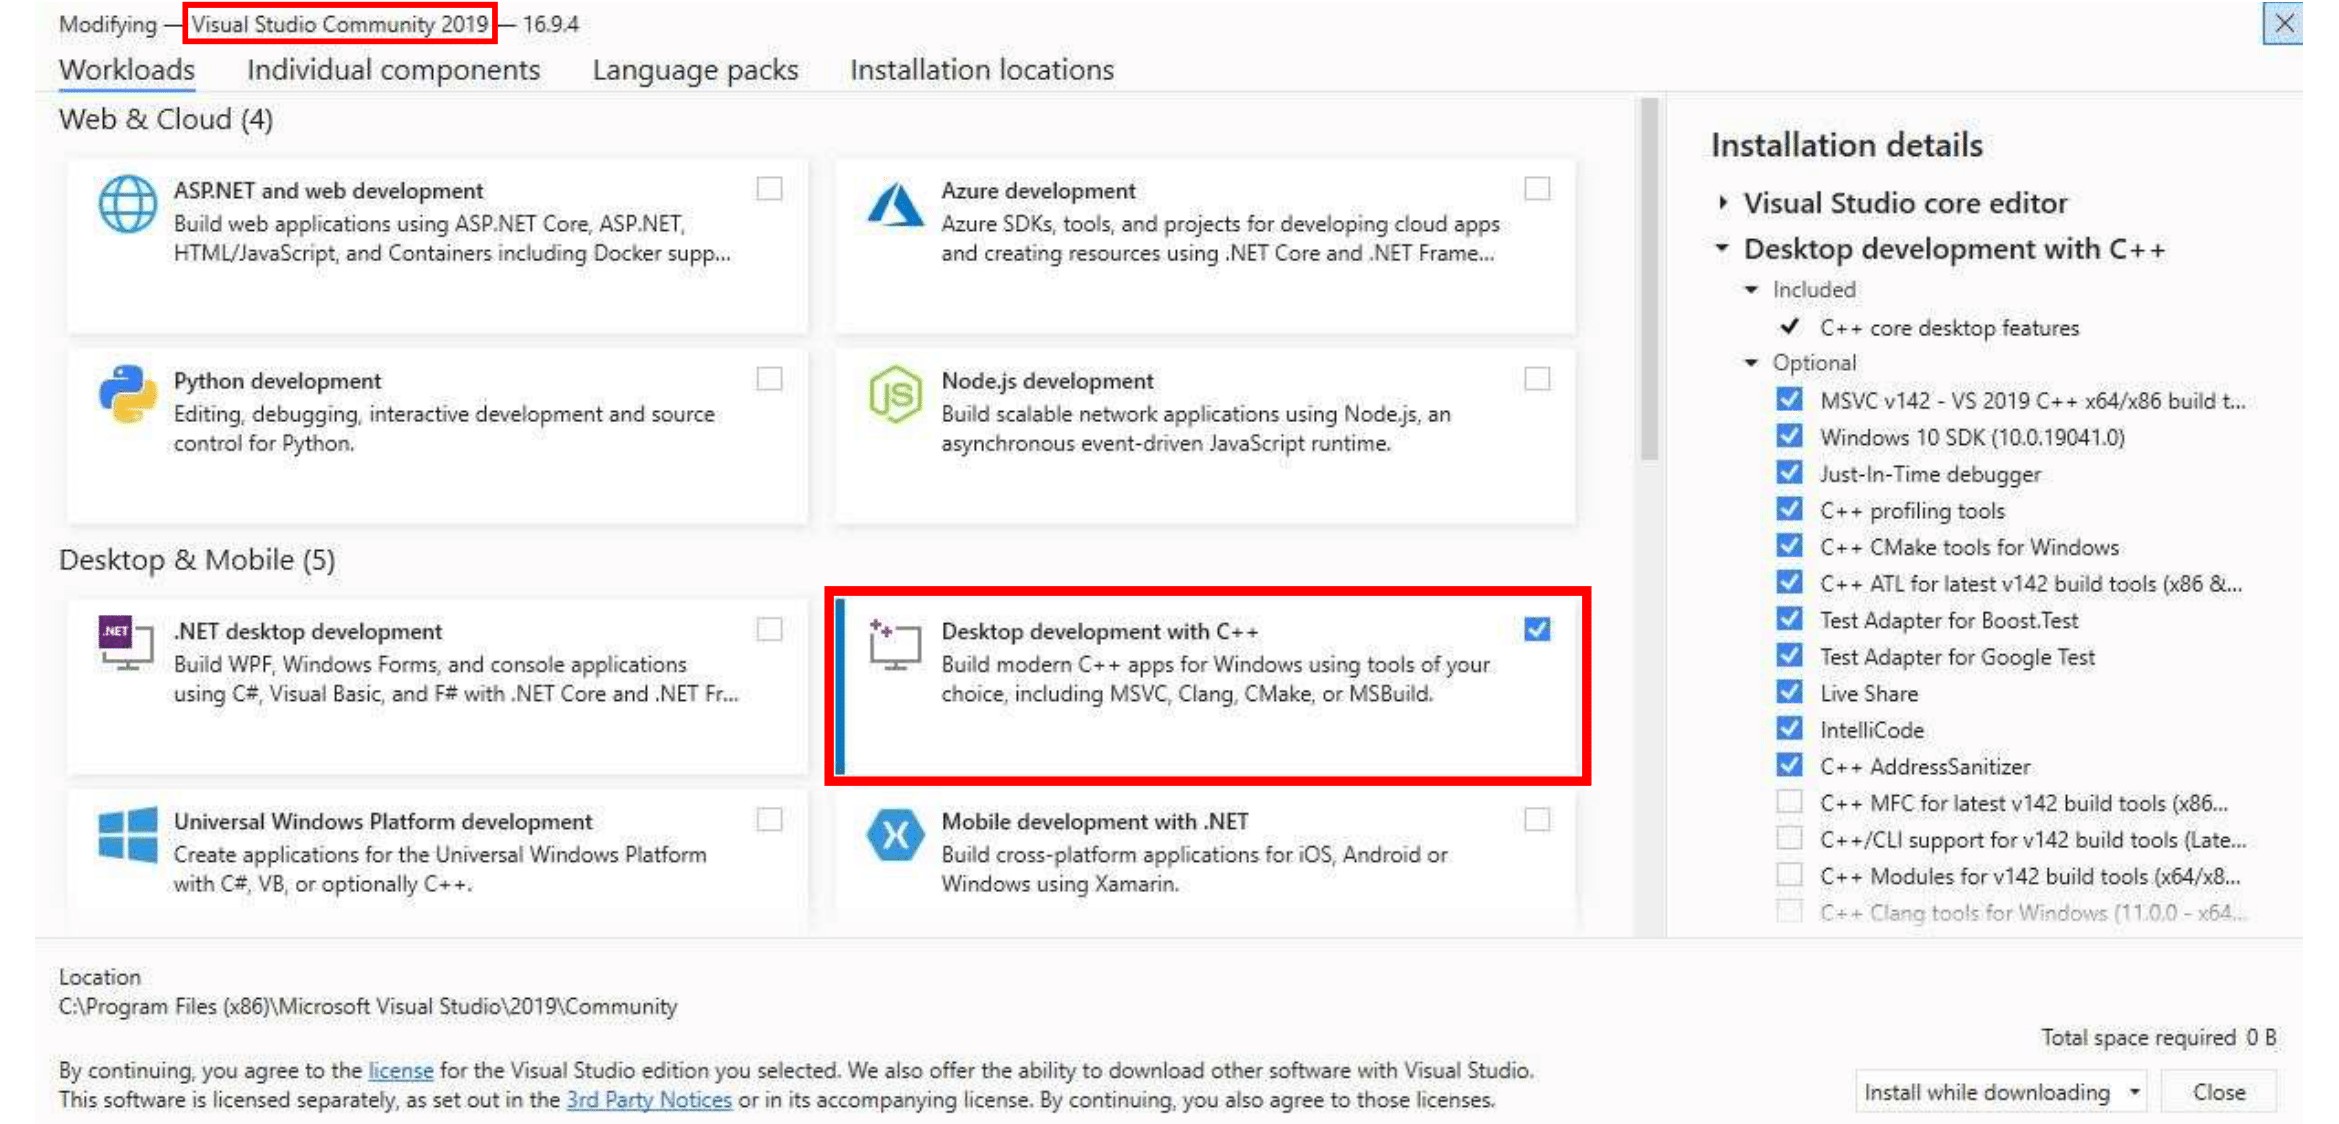
MS Visual Studio (Community) ≥ 17 (2022) (Desktop) (No preview)
-
-
Download the standalone installer
- During Git installation - Adjust your PATH environment. Pick "Git from the command line and also from 3rd-party software".
-
-
- Download the installer and follow the steps to set it up.
-
Install the compiler / IDE Visual Studio Community 2022 (ver 17)
You will need to install the C++ compiler.
To do this, select Desktop development for C++ under Workloads -> Desktop & Mobile.
-
MySQL Server Community Edition
Note: MySQL ≥ 8.0 is recommended. Version 5.7 is deprecated and will soon not be supported.-
Download the Windows MSI Installer.
-
Scroll down to the bottom and click on "No thanks, just take me to the downloads!"
-
When the installation is almost done, make sure "Launch the MySQL Instance Configuration Wizard" is checked, then click "Finish".
-
When the MySQL Instance Configuration Wizard launches, most default options are fine, but remember the username and password you use (root // whatever). You will need them to log into your chosen database management tool (below) in order to import SQL files later.
-
To test if MySQL is set up correctly, hit CTRL+ALT+DEL on your keyboard, enter the Task Manager, and select the "Services" tab. In the list of services you should see "MySQL" with a status of "Running".
-
Add MySQL to Environment Variables.
-
Go to Control Panel -> System
-
Go to Advanced System Settings
-
Go to Environment Variables
-
Under "Systemvariables" select Path
-
Edit and add your install path of MySQL, i.e C:\Program Files\MySQL\MySQL Server 8.0\bin\
-
-
-
Choose a database management tool
-
MySQL cli (Fastest)
-
HeidiSQL (Best for beginners)
-
MySQL Workbench (already installed if you chose to install the full MySQL package)
-
DBeaver (Multiplatform Database Management Tool)
-
Try connecting to your database. You may be looking for "Connect to Host", "New Connection" or "Session Manager" depending on which program you use.
-
Create a new connection/session. The Hostname/IP address of "127.0.0.1" or "localhost" is fine if you installed MySQL on the same computer that you installed HeidiSQL or SQLYog. Simply fill in your root // whatever password and you should now be able to connect to your database.
-
-
-
Download and install the Latest Release windows-x86_64.msi file, NEVER the RC (Release Candidate) versions.
-
We recommend to compile in 64 bits mode.
-
-
MySQL development files
- These files are shipped with MySQL Server, search for them in the program files directory, MySQL\MySQL Server 8.0\lib / MySQL\MySQL Server 5.7\lib.
-
OpenSSL Download the 64bit version.
Important: Use version 1.1 or 3.0. 3.1 and above is not supported.- Find the 64-bit version by finding the latest 3.0.x Win64 OpenSSL that is NOT the "light" version. (Example: Win64 OpenSSL v3.0.7)
Note: If you get the error 'Missing Microsoft Visual C++ .... Redistributable' while installing OpenSSL, download the Microsoft Visual C++ 2017/2019/2022 Redistributable Package (x64) (Direct Download) (1.7MB Installer) and install it.Note: While installing OpenSSL, choose The OpenSSL binaries (/bin) directory (NOT "The Windows system directory") when given the choice of where to copy the OpenSSL DLLs. These DLLs will need to be located easily for Core Installation. -
-
Download the prebuilt Windows Binary for Visual Studio 2022
-
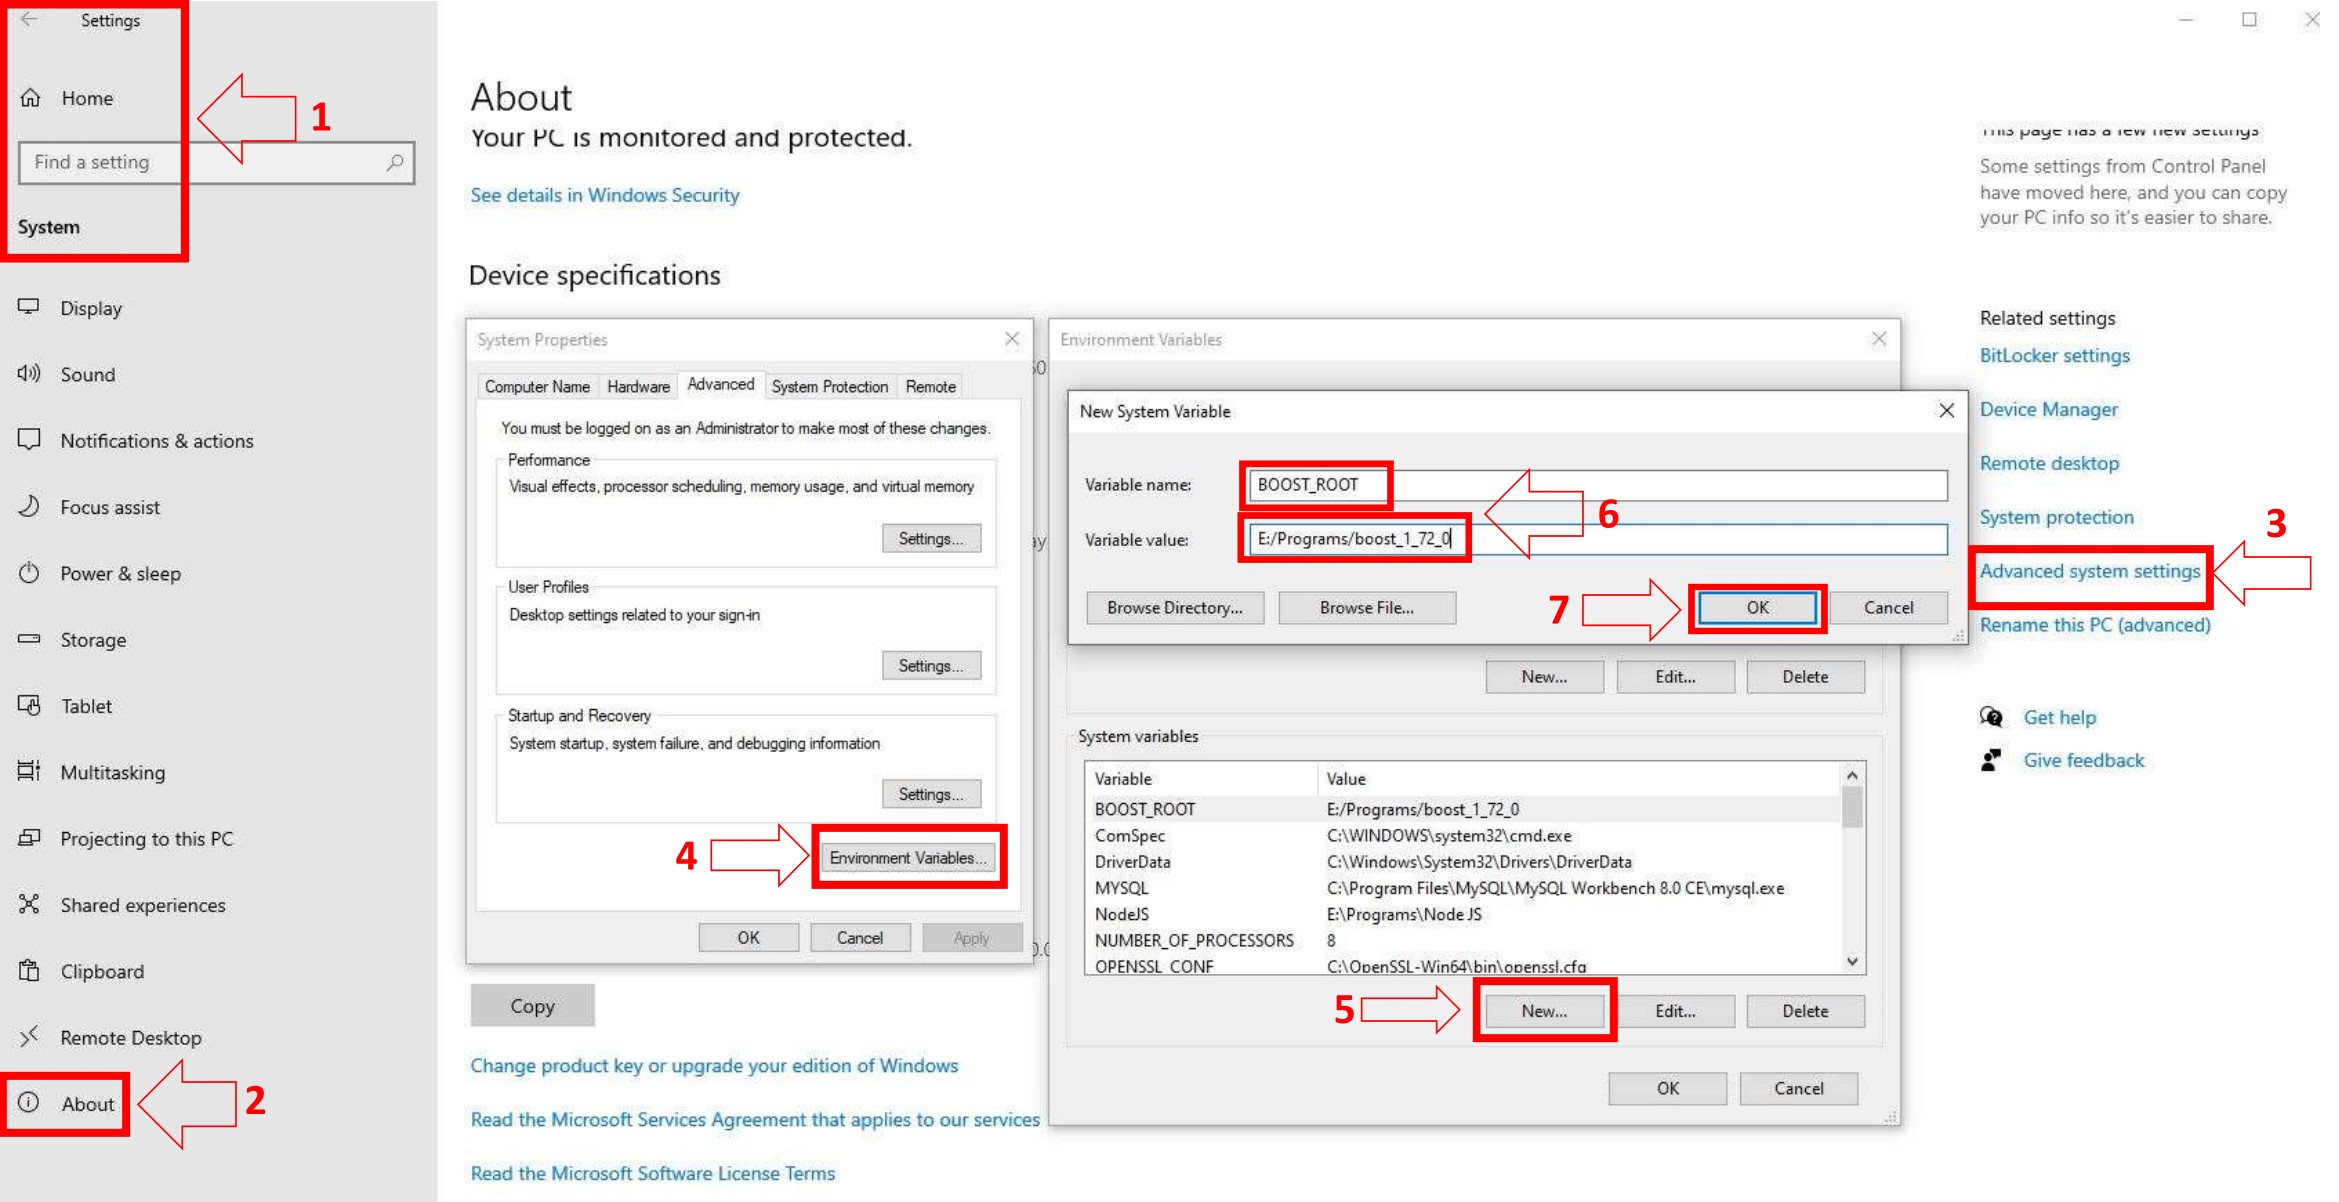
Add an environment variable to the "System" variable named "BOOST_ROOT" and with the value being your Boost installation directory, e.g.
C:/local/boost_1_81_0. Important is to use '/', not '\' when pointing to the directory. (Make sure that it does not have a trailing slash (end of the path). If you still get problems, add the same variable in theUSERvariables section too, as shown in the image below.)
-
Help
If you are still having problems, check:
-
Join our Discord Server, but it is not a 24/7 support channel. A staff member will answer you whenever they have time.
| Installation Guide | |
|---|---|
| This article is a part of the Installation Guide. You can read it alone or click on the previous link to easily move between the steps. | |
| << Start: Installation Guide | Step 2: Core Installation >> |